Harvesting cannabis is so easy that even complete beginners can do it right the first time.
In one of our previous articles, we’ve discussed how professional weed growers know when to harvest their plant.
In short, pro growers like to use a combination of several dependable signs that indicate the flower ripeness. Once your plant hits that harvesting window you need to take action if you want your buds to max out on THC.
And the secret is not just about knowing when but also how to harvest your cannabis the right way. I mean, it’s not like you’ll just pluck the buds with your bare hands after spending months feeding and nurturing the plant.
Now for the good news:
It’s really hard to mess this up, especially when you follow a checklist like the one below.
Here are the tools you’ll need (the links will take you to some awesome items on Amazon):
- Powder-free gloves
Why?
Buds are really sticky so when you touch them with your fingers, precious THC sticks to them and then you end up smoking less potent bud in the end. Put on some powder-free gloves and your harvesting will be much smoother as you are keeping the dirt and oil from your fingers off the buds.
- Quality trimming scissors
Why?
Let’s face it, you will be doing a lot of trimming. It is an important process when harvesting as it allows you to remove fan leaves, sugar leaves, cut off the stems and just get a clean bud in the end. My best recommendation is to get yourself a pair of precise spring-loaded trimming scissors, although a pair of regular scissors will also do just fine (your hand might hurt a bit, depending on the amount of weed)
- 99% isopropyl alcohol (optional)
Why?
This is not an essential item but it can be a lifesaver when there is a ton of resin sticking to your scissors. If you’re harvesting just a couple of plants at home, you might not need this item. To get the resin off of your scissors, just soak them in a cup filled with isopropyl alcohol for a couple of minutes and wipe off the resin with a paper towel.
- Two plastic containers
Why?
One container is for the trimmed buds and the other one is for trim material — you will trim your buds above the second container. Also, when you grow weed at home, you don’t want to throw everything away, as you can use the trim to make weed tea, or other edibles.
Pro Tip:
When you’ve finished trimming your buds, you can leave the trim to dry out for 3 days and then just cure it as you would do your buds. It will amp up the potency of the trim.
All clear?
Great, let’s jump into the tutorial.
Pluck the fan leaves from stems by pulling them downward
Many growers call this the pre-harvest trim:
What you do, essentially, is pluck the fan leaves from stems, which makes the detailed trim much easier.
As you probably know, fan leaves do not contain cannabinoids (only in traces) and you just don’t need them at this point.
Pluck the fan leaves by pulling them downwards, towards the root. There is absolutely no need to cut them off as your hands will do just fine at this point.
Just remember to wear gloves.
Cut off the branches that contain colas (buds)
Use your trimming scissors to cut off the stems where the buds are. The reason we are doing this is to make the manipulation easier. Some cannabis plants can be rather big and bushy so trimming branch by branch is actually quite faster and plus — it keeps you organized.
You can start from the biggest cola on top and work your way down.
Steps 2 and 3 in this tutorial you should do together.
Let me explain:
Once you cut off each branch, you will follow the advice in step 3 and do a detailed trim. Then you’ll go back to cut off another branch and so on until you harvested the entire plant.
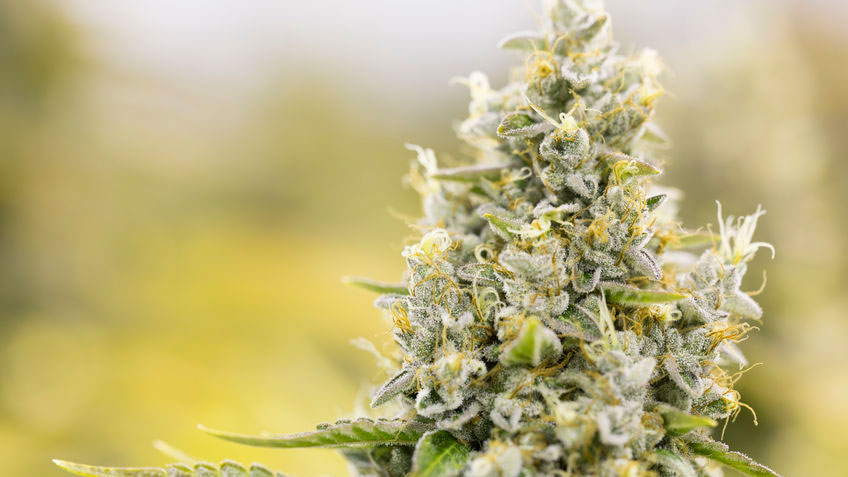
Manicure your buds by trimming the sugar leaves and areas around buds
The goal of this stage is to trim off the bigger sugar leaves that are sticking out from the bud.
Using your scissors, slowly work your way from the bottom of the cola to the top, trimming away all leaves that stick out.
Remember, sugar leaves contain quite a bit of THC and they will be an important part of your trim so make sure to keep it all for when you make your hash later. It’s good to be economical when you invest months into a plant.
When doing this detailed trim, try to be precise and be meticulous. If you can spend more time getting all the smaller leaves out, then by all means do it.
Once you’re finished, off to the washing station.
Wash your buds using the 3-bucket method (optional)
Bud washing became an Internet sensation among the 420 crowd. The technique reportedly makes your buds extra creamy in addition to washing away all contamination.
If you’ve been growing your weed completely organically or just don’t feel like doing this, then feel free to skip this step and just go straight to the drying rack. Look, here’s a drying and curing tutorial (how did it get here?).
For you adventurers, bud washing goes like this:
- Prepare 3, 5 gallon (18 liter) buckets:
- Bucket one: room temperature water (5 gallons) infused with 1 cup of baking soda and 1 cup of lemon juice
- Bucket two: warm water (5 gallons) from the tap
- Bucket three: cold water (5 gallons) from the tap
- Dip the entire bud (the branch) into bucket one then pull out and let drip off
- Briefly dip the bud in the second bucket and let drip off
- Finally, dip the bud in the third bucket, let drip off
When you’re done, hang the bud for 1 day above the bucket so it can dry off. Afterwards, just move on to the drying & curing stage as you would do.
Related Posts


Luka Petkovic
Editor in chief at Greencamp. Researching topics related to the biochemistry of cannabinoids and interested in the latest industry happenings.
Nicola hodson July 14, 2019 at 5:06 pm
I didn't use powder free gloves and lots of the THC stuck to the gloves. I have heard that if you scrape it off the gloves into a plastic container then into the freezer for a couple off weeks. Then you're left with the crystals and the best shit. Is this true?
Luka Petkovic July 15, 2019 at 9:25 am
Yup Nicola, that could be done easily.
skyler brian jones August 28, 2019 at 5:24 am
you are the best website
Luka Petkovic August 28, 2019 at 8:23 am
Well thank you!
William J Davidson September 11, 2019 at 6:26 pm
Just a fantastic read, Thank-you and hello from Canada
Hank September 24, 2020 at 12:13 pm
I’m new to this process. I don’t have a drying room. What can I do this time to solve this problem? Just use a closet?
Reese October 16, 2020 at 6:19 pm
Good question. I don’t necessarily have one either
Buddy October 17, 2020 at 8:40 am
Use the grow tent as a drying room if it's empty, extractor fan & filter will deal with the smell.
Robert February 21, 2021 at 6:02 pm
If I clip the top Buds /branches, will the small buds down below grow bigger? Or do I just accept the small buds as is.
Julie July 5, 2021 at 2:24 am
Hi Im new to this. How do you tell a male from a female?