I’m here to tell you that growing weed indoors step-by-step is easy. Just follow along.
Because it’s the first choice of thousands of beginner growers, I’ve decided to put together the most comprehensive soil weed growing guide on the internet.
In this guide, we will go through the whole growing process, from choosing the seeds and soil to harvesting and curing the buds. Hopefully, by the end of this guide your cannabis growing knowledge will grow as much as your plant.
Learn how to grow cannabis with our free eBook
We are giving away a PDF version of this post, so you can read it when it’s convenient for you. Just let us know where to send it (takes 5 seconds).
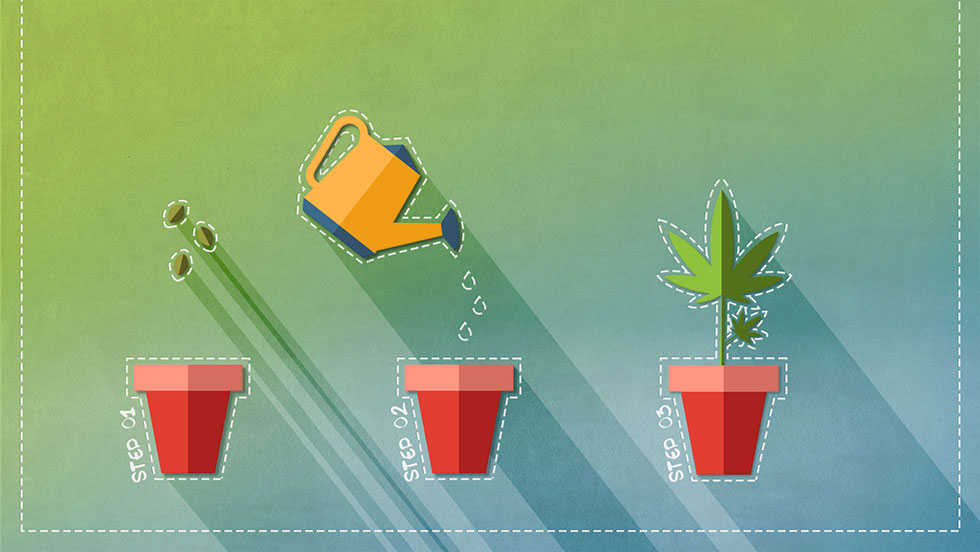
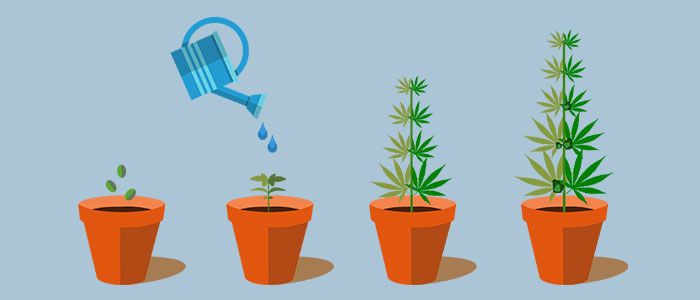
Preparation stage
The first week (or week 0 as I like to call it) is when you prepare your grow.
It doesn’t necessarily have to be a whole week, however it can often be longer.
You might think:
“So, it’s not a week at all?”
And you’d be right.
You won’t be doing any growing this week as you can’t grow plants without the seeds first.
Week 0 is focused around finding the best soil, seeds, lights and setting up your growing tent.
Even if you are growing hydroponic marijuana you have to do the prep stage, which might be even longer for hydroponic setups.
Seeds
For this indoor soil growing guide we will use one of the most popular strains ever: White Widow.
But, we won’t use just any White Widow.
For this occasion we will use the autoflowering version of this plant.
Why?
Well, for a few simple reasons:
Autoflowering plants are smaller, but they don’t cut down on the yield, they are easier to grow, and they grow faster than regular plants.
You will want only feminized seeds for this grow as male plants do not grow flowers.
Soil
“Your plant is only as good as your soil.”
I find this to be one of the biggest truths of growing cannabis.
Beginner growers often experience problems with their soil, such as malnutrition and over-watering.
Both of these will have a long term effect on your plant if not dealt with in the quickest manner.
This is not to say that cannabis won’t grow in slightly bad conditions, far from that.
It’s called “weed” for a reason. It will grow even in sub-par conditions, however the end result might not be what you hoped for.
So, in order to avoid any confusion, do your best to get the perfect soil, and if you fail, you can still make it up by adding nutrients.
Feel free to buy any of the branded soil mixes, except for those that are labeled “extended release”as they will release nitrogen to your plant roots for up to 6 months, meaning that you will have n0 control over the pH levels of your soil.
The best option out there for first-time growers is “Super Soil”, a special mix of soil that can be found in stores. KindSoil is one of the more popular brands of Super Soil.
With any Super Soil mix you won’t have to add any nutrients, as the mix comes premade, so water will be the only thing you add to it—by watering the plants.
Fun fact:
Did you know that earthworms in soil can increase the yield up to 75%? According to scientists from Netherlands, earthworms might be one of the most important parts of a soil-based grow.
However, this study was done on wheat plants so I wouldn’t suggest you throwing earthworms in the mix if you haven’t had at least a dozen successful grows.
Lighting setup
Lights are super important for growing cannabis and insufficient lighting is one of the biggest reasons why many indoor grows fail.
Lighting depends totally on the size of your grow.
Basically there are 2 most common options for lighting:
- LEDs
- CFLs (Compact Fluorescent Lights).
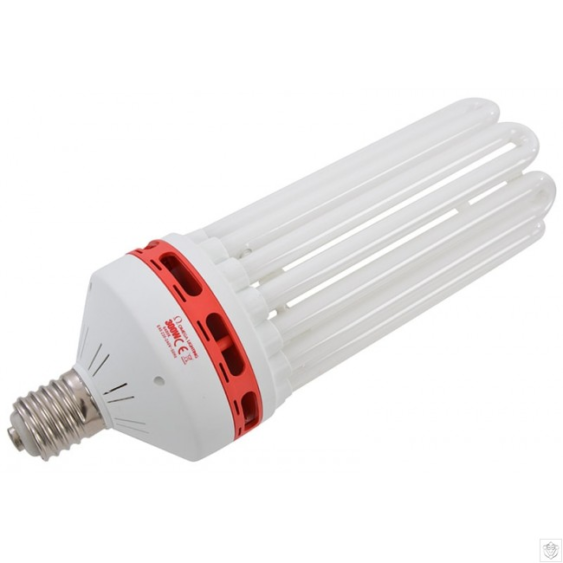
CFLs give off more heat than LEDs and are better suited for growing in small spaces, such as tents.
Their downside is that they tend to spend more energy and you will have to readjust them more often than LEDs.
So, my end recommendation is this: if you have room for LEDs and you are willing to go through the hustle of setting up LEDs, be my guest.
For a small first time grow, I would suggest getting a CFL setup with lights up to 300W.
Keeping CFLs close to the plants will bring in the best yields and ensure the biggest plant growth.
The tent
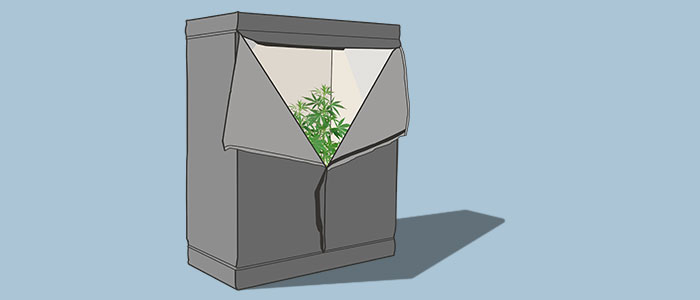
Growing tents are perfect for those that tend to grow in their garage or colder areas of the house, as the tent holds the warmth within itself, helping plants get bigger as soon as possible.
If you plan on growing marijuana in a closet, or a similar closed space that doesn’t let too much heat out, I would suggest that you approach it with caution.
Either way, the most important thing is to keep the temperature at a constant 25°C (77℉).
In case you do go with a tent, you will have to extract the air from the tent, which is removed using a fan that sucks the air out through tubes.
Most modern tents have a carbon filter which prevents the smell of weed leaving the tent, so keep that in mind when shopping for one.
If you still think you can make do without a tent, then get ready to spend some money on fans and/or ventilation systems.
Most modern air extractor fans include temperature and moisture controllers, which will come very handy when calculating your VPD (we’ll get to that later), so I strongly suggest you get one of those.
Light schedule for growing weed indoors
Light periods for autoflowering plants are really easy to grasp:
All you have to do is keep the light turned on.
Like, all the time.
I am not joking when I say that you should keep the lights on 24/7.
Giving 24 hours of light is crucial when growing autoflowering plants, as it may give them the best chance to grow bigger in the vegetative stage and then eventually flower when their time comes.
Autoflowering plants do not need darkness.
Autoflowering plants are not dependent on changes in the light cycle to commence flowering.
This is why they can be grown using a light cycle of anything from 16 to 24 hours daily.
This is also what makes them perfect for first time growers as light periods are one less thing to worry about.
Germination & seedling stage
Time to put those girls into action!
But first, some more prep.
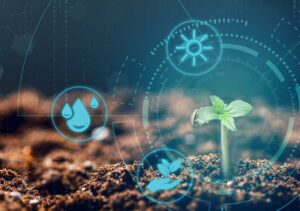
VPD for weed

Creating the perfect environment for your plants doesn’t necessarily end with buying all the right gear.
You will have to know how to properly set it up, and more importantly, how to make the perfect atmosphere for your plants to grow to their potential.
Dehumidifiers decrease environmental moisture and release heat, which can be helpful in certain cases like very moist and cool areas, such as basements.
If you want know how to grow big buds indoors, you have to understand the importance of VPD.
Whether you are growing weed in a closet or a tent, you will have to control the atmosphere.
Humidity is one of the more important factors to control and this is in part due to the fact that different humidity levels are best for different growing stages.
In general, the air humidity for growing weed indoors is as follows:
- 70-80% after you see the first leaves
- 40-70% during the vegetative stage
- 40-50% during the flowering stage
- <40% in the last week before harvest
One thing which is closely connected to air humidity is VPD.
VPD stands for Vapor Pressure Deficit, and it represents the difference between the pressure of water vapor in 100% saturated air at a certain temperature (leaf’s vapor pressure) and actual vapor pressure in the air surrounding the plant.
Plants with higher VPD values will generally have a higher transpiration rate and increased nutrient movement.
Germinating weed seeds
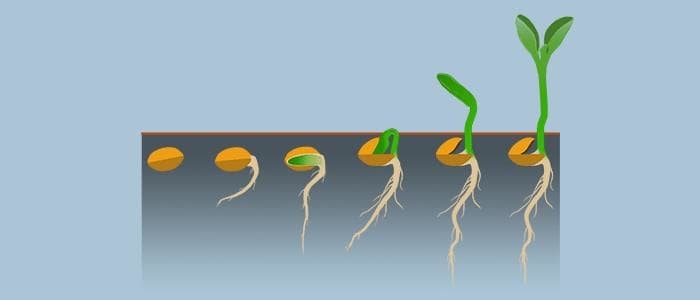
Learning how to germinate a weed seed is a piece of cake, and also the first step you will take towards your new hobby.
Germinating seeds is a process of forcing them to begin to grow and put out roots.
Seeds can be germinated in many ways and the first time you do it you will get a hang for it because there isn’t really too much science behind it.
How to germinate weed seeds?
There are several ways to do this.
Germinating seeds in soil
Germinating seeds in soil is the easiest way to do it because all you have to do is toss them in your pot, cover with some dirt and douse with water.
You only need the soil to be damp so make sure you do not over water it. You can use clear kitchen plastic to wrap the tops of the pots to maintain humidity. Keep the pots in a warm area.
Germinating seeds in water
Germinating seeds in water requires even less effort than germinating seeds in soil.
You literally just have to throw them in a cup of water for 14-18 hours.
One thing that makes this way better than germinating in soil is that you can see if a seed is bad by checking if it didn’t sink. Those that sink are good.
After the seeds start rooting, move them on a damp paper towel and cover with another damp paper towel.
Place the paper towel covered seeds in a dark area and they will grow roots in a matter of days.
After that, all you have to do is move them into a pot.
Germinating seeds with paper towels
For this method, you take a couple of seeds, put them on a damp paper towel and cover with another one, after which you store them somewhere dark.
After a few days you should see roots embedded in the paper towels.
You can do this with gauze and cotton wool as well.
Seedling stage
Seedling stage begins once you’ve moved your seeds from the paper towel into the pot and you start seeing the first leaves break out from the ground.
Here’s a photo of a plant a few days into its seedling stage:
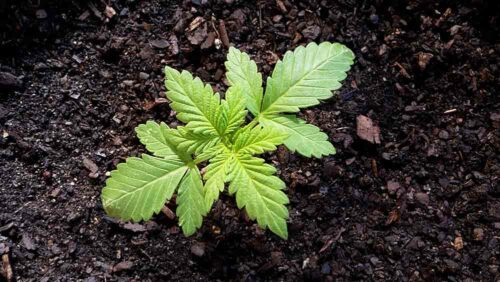
That is exactly what your plant will look like maybe a week after you’ve moved the seeds into the pots.
Here’s the deal:
You don’t really have to do much during the seedling stage.
You don’t even have to water the plants too much as you’ll want the soil to be a bit dry so that the roots can catch better.
You might be thinking, “This man is crazy!”, and you’d be right.
But, letting your plant root strong is a great idea during the seedling stage, just make sure you don’t over water and suffocate the plant.
Over-watering is one of the biggest mistakes you can make, but we’ll get to that in a bit.
One of the most important things to remember for the seedling stage is that you will want to move your plants in a bigger pot as soon as you see the first few leafs show.
Knowing how and when to transplant your plants is perhaps the best knowledge we can pass onto new growers, as leaving plants in small pots can choke them up, while moving them too early can have terrible effects, especially if you don’t do it right.
Further along the road you will most likely have to re-pot the plants again.
I strongly suggest you move the plants as soon as you see the first leaves appear.
The second re-potting should happen once your plants have rooted in firmly and appear ready to be moved—this means that the plant looks stable enough to be moved.
Whatever you decide to do regarding re-potting, keep one thing in mind: The less root damage the better.
Vegetative stage
Vegetative stage starts when you see that the plant is looking more like a weed plant than just a regular plant, meaning that it has clear weed-like characteristics.
You will start seeing the recognizable fan leaves and many branches stemming from the trunk, alongside that familiar skunky smell.
Vegetative stage starts roughly around the second week for most autoflowering plants, but for others it might start in the third week.
Either way, once your plant starts growing in size by the day you will know that you successfully reached the vegetative stage.
Watering weed plants
Watering weed plants is a tricky business if you’ve never watered plants in your life.
Most growers water their plants from the tap so there aren’t really any reasons why you shouldn’t do the same.
The amount of water you will use for your plants varies depending on the specifics of your grow and the environment in which you hold the plants.
It also depends on the size of the plant, air temperature, soil composition, water quality and the capacity of your air filtration systems.
However, seeing how this is intended for beginner growers we won’t go in depth too much with watering.
Let me just leave it at these 3 things:
- Water whenever you feel that the top of the soil is dry
- Bigger pots — water less often, smaller pots — water more often
- Make sure you have appropriate drainage (to avoid overwatering)
How to clone weed plants
Similarly to re-vegging autoflowering weed strains, cloning them is extremely hard or next to impossible to do.
This is due to the fact that autoflowering strains have grown in the northern areas of the planet in which they had limited time to flower.
Cloning an autoflowering seed will create a plant of the same age as the mother plant.
Clones share the exact same genetics as the mother plant, which includes their age.
So, if this is your first grow, chances are that you won’t even try cloning a plant.
If you’re growing a photosensitive strain, however, cloning should be a piece of cake.
Here’s how to clone a weed plant:
- Contrary to popular opinion, don’t cut off the most bottom node. Cut at least the 2nd or 3rd node.
- Fill a solo cup with soil and punch a hole on the top of the soil about 10 cm deep.
- Shave off a bit of the skin on the bottom of the cutting so it can form roots more easily.
- Stick the freshly cut branch in the hole you just punched and water your new plant.
Cloning weed plants is a great way to save money and keep growing the same plant with great genetics over and over again. You can clone one plant as many times as you want, and the clone of that clone.
Hell, cloning works even with cats.

Flowering stage
Once your plants reach a decent height and size it is time to flower.
Since we are growing an autoflowering strain, you won’t have to put any effort into changing the light schedule or anything.
Once your plant feels the time is right, it will start flowering.
How to know if your plant is male or female?

“Feminized cannabis seeds are bred to contain no male chromosomes, thus ensuring that every plant grown from them will flower as a female and be able to produce the crop of resinous buds sought by most growers”.
But, what happens if you buy random seeds which aren’t feminized?
Well, in that case you will simply have to sprout all the seeds, and wait for them to grow up a bit.
There are some general rules that will help you determine the sex of your weed plant:
- Male plants mature faster, most of the time about two weeks before females;
- Male plants also have “false buds” which are actually pollen sacs;
- Male plants have flowers while females still have pistils at this point.
It is important to keep in mind that cannabis plants can also be hermaphrodites, which means that one plant has both male and female traits.
Post-harvest stage
Most autoflowering plants will show best results around the 11th or 12th week, which is usually a great time to harvest.
But, before you cut your flowers and start drying, here are 2 things to know before you throw away the remaining pieces of the plant:
- Harvested plants can grow again and bring more crops (unless they are autoflowering strains) by re-vegging the plant;
- You can still clone the plant that you just cut up as long as there are healthy leaves.
Make sure that you don’t rush too much with harvesting, as cannabis needs time to develop higher levels of THC, so harvesting a bit later is a lot better than harvesting too soon.
How to re-veg weed plants
To reveg a weed plant means to send it back to the vegetative phase right after the harvest.
Now, I know I said that we will be using an autoflowering seed for this, and the common knowledge is that autoflowering plants cannot be re-vegged.
However, let us pretend again for a minute that we started with a photosensitive seed, in order to show you how re-vegging works.
You might wonder:
“Why reveg weed when you’ve already harvested the plant?”
There are multiple answers to this question:
- If you had a great yield and you want to repeat the same results;
- If you don’t want to spend money on new seeds;
- If you want the same genetics but different results.
So, in order to re-veg the plants you will first have to harvest it.
To sum it up:
- Cut off all the bigger branches and just leave the trunk of the plant snapped with a few of the smaller branches remaining
- Those smaller branches should have a few flowers on them. From these flowers you will see new leafs appear and grow once the plant starts to re-veg
- Put the plant back into the growing room and give it 18 hours of light.
You will see new branches appear from the old flowers and once it hits a decent size, put it back to 12 hours of light and 12 hours of dark so that it may flower.
Most plants that get re-vegged will start growing in a bushy manner rather than straight up as they used to.
This is a slow process so don’t be hasty and take your time taking care of the plant as it is a hard process for the plant as well.
How to dry weed

There are 2 things to keep in mind when drying weed:
- The room has to have a certain level of humidity, which is around 50%-60%;
- The optimal temperature for your drying room is 21°C (70°F).
For best results, you should dry your buds slowly over the course of 3-7 days.
The drying time depends heavily on the climate in your area. In high-humidity climates the drying process will likely last longer, and vice versa.
Experienced smokers know how a properly dried bud feels in the hand, so if you are not certain don’t be afraid to ask.
Here are a few rules to keep in mind when you’re drying buds:
- Keep the area clean and dust-free;
- Control humidity and temperature (50%-60% and 70°F or 21°C);
- Remove the big leaves and hang the pruned colas and buds upside down on a clothing line or wire;
- Keep them properly spaced out, especially in relatively humid drying rooms;
- Move the nugs to the curing jars once the twigs start snapping.
Once you’ve moved your buds to the curing jars, the curing process begins.
If you wanna read in depth about drying weed, click here for our full article on how to dry weed.
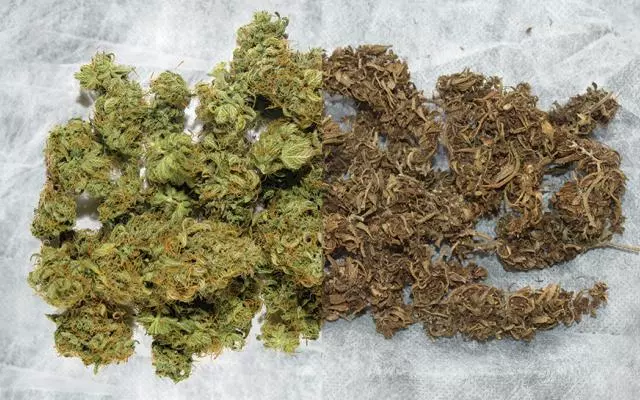
How to cure weed
Curing marijuana buds is the last step in producing a smokable flower. After curing, your weed will have a much more impressive smell and taste.
Here are some of those big truths about properly drying and curing marijuana:
- This process breaks down chlorophyll and improves taste and smoothness of the smoke;
- It will bring out the specifics of your strain when done right, such as the smell and fine flavors;
- Less chances of mold appearing on your buds.
Check out the photo below for a comparison of well dried and cured weed and poorly dried and cured weed.
Here’s a 5 step tutorial on how to cure weed:
- Trim off the smaller leaves and stems that you find remaining after the drying process;
- Place the buds in an airtight mason jar, but make sure you don’t cram them up inside. They need some space to cure properly;
- Place the jars in a cool, dark place, and make sure there is no sunlight as it breaks down cannabinoids. Make sure you take off the lids every day for 60 minutes to get the fresh air in;
- Control the temperature (around 70° Fahrenheit or 20° Celsius) and humidity in the jars around 60% by using humidity packs;
- Cure your buds for at least 4 weeks to get the optimal potency and taste, and if you aren’t in a rush you can cure for 6-8 weeks for high-grade buds.
Many people have used small refrigerators for curing weed, as it is fairly easy to control the environment within with heat and humidity packs.
Curing weed in a fridge might be a great way to start if you’ve never done it before.
It is easy, it is convenient as little to no smell is left behind, and there is no way the light will come in.
Go wild
Now it’s up to you to get started and go wild.
Growing weed can be a great hobby for all those that have enough time and passion for smoking cannabis.
Young adults do it all over the US and Canada, just as much as retired folks because it doesn’t require much to be good at it.
Experience is perhaps the biggest factor in growing weed, so don’t be surprised if your first crop doesn’t yield much or the buds don’t look like the ones you buy in a medical dispensary.
These things depend on just about everything, from the strain you are growing to lamps that you use and how long you dried and cured buds after harvesting them.
If you ever get stuck, or things start going south (leaves going yellow, mites problems, etc.) don’t be afraid to ask for help. There are people out there just waiting to hear your problems and see your plants. Many Facebook groups are named “Growers helping growers” so it might be a great idea to join one, just in case you need advice and assistance over the course of your grow.
Keep learning about cultivating cannabis
Related Posts


Alex Trpkovich
Experienced cannabis content creator, writing about the latest cannabis news, stock market updates and cannabis culture.
Dennis Davis February 23, 2018 at 5:30 pm
Hello, very good advice for a first timer. Did not over do the basics of getting smoke able bud.
Dave October 26, 2020 at 8:34 am
High",I just germanated,a couple seeds,they got there roots.i put them into soil,they came up 3days,two leafs came out ,couple days to passed they died.? Why
Bella Dushner May 9, 2018 at 4:47 am
I am a newbie when it comes about growing marijuana inside. And i read here https://www.worldwide-marijuana-seeds.com/blogs/marijuana-news/117456773-are-indoor-grows-making-legal-marijuana-far-too-expensive that growing inside the house is way too expensive than buying it outside. But i think as a starter it would be expensive but if this grows it will lessen the cost. Am i right about this? Appreciated for the reply. Thanks.
Alex May 10, 2018 at 8:51 am
Yeah you are totally right. There are ways to keep the costs down, you can experiment with different types of lights if you are growing indoors, but outdoor growing is always a cheaper way to do it...
Matthew Bishop May 18, 2018 at 8:55 am
Hello there! I was just wondering, if it's a stupid or good idea to start growing marijuana strain like this http://www.ilovegrowingmarijuana.com/avi/ in forests nearby my hometown now..Autumn is coming and the plants won't be ready to harvest for 100% sure before winter comes... But will they survive the winter and start growing in spring? I probably won't be around in springtime when i usually would put out the seedlings in the forest.. what do you think? Thanks for your input!
Alex May 18, 2018 at 8:59 am
Hey Matt! Honestly, I've never even heard of Avi so I wouldn't be the right person to ask. As for growing outdoors, it's always a good idea to grow your plants in places that allow your plants to get the max amount of sunlight. A forest is not a good place, especially if it has a thick canopy. As for keeping them out in the winter, they will most likely die. Hope that answers your questions :)
Nick January 13, 2019 at 7:49 pm
So I have some Led lights with the watts and lumins I need for my 2 plants.. I have the seeds and everything.. So should I use regular water to eater then or carbonated water?thanks
Alex January 14, 2019 at 9:37 am
You should use regular water, you can use tap water but make sure to check the pH value. You should never water the plant with carbonated water, but you can sprinkle it a bit on top of the leaves just make sure you don't hit any of the flowers. Carbonated water in the soil has other minerals and things in it that will upset the PH of the soil and create unwanted air pockets and such.
Sepiltura January 21, 2019 at 11:45 pm
Regarding random seeds and telling the sex. You can tell the sex of the seed by looking at the end of the seed where it was attached to the plants. If you see a perfectly round circle cone shaped like a volcano , it's a female. Oval or misshapen circles no volcano shape ( center of circle filled in) are male seeds.
Steven McCabe June 7, 2020 at 2:47 pm
This doesn't always hold true, so you'll still want to double check the sex later on. But inspecting the seeds like this can result in a higher rate of female plants, so it's definitely a good idea.
Shane Howard February 25, 2019 at 8:44 pm
im using aero garden to get my seedlings going but need to transfer them because its a small setting. Any advice on what to transfer to? water to soil? will that screw everything up?
Chuck May 3, 2019 at 1:42 pm
On average, how many plants to grow for 1 persons use? I realize this depends on how much one smokes but I am just looking for an average.
esther morgan April 27, 2020 at 11:36 am
How do you grow such seed
Vic May 15, 2021 at 9:07 am
Hi! It’s very good and interesting manual. I hope that helps people to take a good harvest. Could you send me a PDF version of this text via email? Thank you for your help.