Among stoners there are many who are also interested in cultivating the plant, not just smoking it. The problem is – that is a very time-consuming job.
While experienced cannabis enthusiasts may have fewer issues along the way, growing cannabis plants can really turn out challenging for beginners.
It’s important to know that there are some common rules to follow for all strains. Apart from those, each strain and its cultivation come with an additional set of unique rules which you’ll need to research on your own once you pick the strain you want to cultivate.
Today I’ll focus on some general rules that are a must if you want your plant to grow properly and be healthy.
No matter what strain we are talking about, these 10 good practices will apply to all of them.
Choose your strain carefully
The first thing you need to do is choose what strain you want to grow. Here are some basic questions that you need to ask yourself first:
- Do I want mental or physical effects of this strain to be more profound?
- What kind of weed smell am I looking for?
- Do I want the plant to be visually attractive?
- Are harvest cycles of my strain optimal?
Of course, these are just some examples of questions to ask, but it’s a good starting point for both experienced veterans and newcomers alike.
Ideally, you should look for a strain that can grow quickly, has high potency, and produces a lot of buds. While female plants are the ones that satisfy all of the mentioned criteria in an ideal scenario, you need both male and female seeds to optimize your breeding.
Make sure you have enough space for your plants to grow
Once you’ve chosen your strain, the next thing you need to do is provide enough space for the plant to grow properly.
You can grow your weed both indoors and outdoors, but to prevent complications, I definitely recommend growing it indoors. That way, you won’t have to worry about nasty weather at all.
On top of that, you will get full control over all other aspects of growing healthy and potent cannabis plants. These aspects range from humidity, water, and nutrients to temperature and ventilation.
Growing your strain indoors will allow you to eliminate all external factors from the equation so that you can focus only on the crucial, internal ones.
Make sure your growing facility has enough room and is properly secured. Growing facilities can be expensive, but there are many cost-effective alternatives, such as DIY greenhouses.
The time has come for the propagation
When we talk about cannabis growth, we’re talking about two main things – the ability to create new genetics and replicate existing ones. Having that in mind, we have two different options – we can either grow our cannabis plant from seeds or clone it.
If you want to grow a plant that you’ve never worked with before or you want to experiment a bit, you should go for the first option.
Once you have the seeds, make sure that your medium is deep and sterile, and also ensure tip #2 – that you have enough room for the plan to grow.
Soak the seeds in the water for about 3 hours and place them in the medium. As long as the seeds are moist but not wet, you won’t have to use any fertilizer at all.
Regular daylight and a normal airflow will do the whole job here. You can expect the first seeds to pop up after five days, and after 14 days, all of them should grow.
If you want to work with an existing plant, you can use the cloning technique.
The new plant will be identical to its mother plant and it will share the same traits as well. While the term “cloning” may be off-putting for some people, the method itself is very simple.
You just need a couple of things – rubbing alcohol, spray bottle with water, plastic container with the medium of your choice (I recommend coconut fiber), and a blade. All you need to do is use the blade on a mother plant, plant it in a medium of your choice, and it will grow anew from that cutting.
Cloning is a more popular method, but once again, the choice is up to you.

Now we need to set up the ventilation system so that the plant can grow properly
If you want your plant to prosper, your ventilation systems need to be set up accordingly. Light, air, and hydration are all important for the plant’s long term health, but it’s the ventilation that gives it the needed CO2 for proper growth.
You also need good ventilation systems to ensure that the temperature in your facility is always in the optimal range.
Here are some tips that you need to follow:
- Get a thermometer. If you want your temperature levels to always be in the optimal range, you need to track them consistently. This is why you need a working thermometer.
- Get a functional exhaust fan. There are three different kinds of exhaust fans and they are all designed to fit different environments. Even though 4” and 8” fans are very popular, my personal recommendation is to stick with 6” exhaust fans.
- You may want to add some oscillating fans as additional support. Depending on the size of your facility, it can be very difficult to reach every plant with a single fan. But luckily, there is a solution – you can get some additional oscillating fans to help you out. These fans are very affordable, and most importantly, you can use them even in exceptionally big rooms.
- Use oscillating fans wisely. Ideally, you shouldn’t blow them directly at the plants. Try to have some breeze from above or below the plant because strong ventilation may be counterproductive and cause significant damage to plants. If you see that the leaves are starting to appear claw-like, that is a sign of damage.
- Maintain optimal humidity levels. 85% is an ideal percentage for cloning, 65% for the vegetative phase, and 45% for the flowering phase.
Choose the best grow lights for your cannabis strain
Next on our list is choosing the optimal grow lights for your cannabis plant. This is a crucial factor for plant growth as it allows you to optimize its grow cycles, photosynthesis, as well as overall health of the plant.
There are four different options here:
- Metal halide lights
- LED lights
- High-pressure sodium lights
- Fluorescent lights (like CPL or T5)
Some of these options are better than the others, but the bottom line is – you can’t make a mistake with any of them. Personally, I like fluorescent grow lights the most, but the decision is yours.
It’s time for some proper water management
One of the best things about growing weed indoors is the fact that you have full control over your water supply. If you want your cannabis plant to grow properly and be healthy, you need to optimize your water management system.
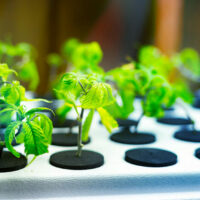
I recommend focusing on Deep Water Culture (DWC). This is an extremely popular and highly efficient method that you can use to grow your plant in conditions that provide optimal levels of water, oxygen, and nutrients.
You don’t need to use any medium in this case, which is a huge plus in my book.
A special air pump will supply the water with enough air, which will prevent the plant from drowning. All you need to do at that point is to add the nutrients manually and that’s it. That’s the whole procedure.
Other people may suggest different alternatives, but DWC has no competition in terms of simplicity and effectiveness.
Don’t forget the nutrients!
Nutrients are extremely important for the wellbeing of your cannabis plant. Don’t be surprised if you see that your plants need a lot of them, it’s completely normal.
While you can avoid them when growing your weed outdoors, the same doesn’t apply for indoor conditions.
All nutrients have a unique label that shows the amount of nitrogen, phosphorus and potassium (N-P-K).
So, if you read something like 8-4-4, that would mean that you are getting 8% nitrogen, 5% phosphorus, and 4% potassium.
Nitrogen will make your plant grow faster, phosphorus will encourage the development of roots and flowers while potassium stimulates the photosynthesis as well as root development.
Ideally, you should keep your potassium levels high while phosphorus can be at medium levels during both vegetative and flowering phases.
As for nitrogen levels, it’s the other way around. Keep your nitrogen low during the flowering phase and high during the vegetative phase. You’ll also need to use a hydroponic fertilizer as well, but luckily, only in the vegetative stage.
You will also need to add some secondary nutrients to the mix as well. I recommend sticking to magnesium and calcium. They work best in most cases.
Always strive to get the most out of the vegetative stage
Once the plant has developed its own root system, the vegetative stage will kick in. This is the phase that requires a lot of dedication on your part, but luckily, I can provide some tips that will make your job easier.
You need about 18 hours of light optimally during this stage. The more light you have, the better for the plant. I recommend using some spectrum lights.
Also, make sure to keep your humidity levels around 65% and the temperature should ideally range between 72 and 85 degrees.
You’ll also need to optimize your nutrients during this phase. Look for fertilizers that have NPK ratios of 2-1-1, 4-2-1, or even 6-3-2. These will do the job perfectly. You’ll also need some weed grow pots to ensure that the roots are as healthy as possible.
Lastly, you should also strive to maximize the yield as much as possible. There are several ways to do that, but my favorite one is low-stress training. With this technique, you can easily force the plant to grow plenty of buds without any cutting involved.

And finally – the flowering phase!
This is the moment that we’ve all been waiting for and easily the most important phase of cultivating your cannabis plant. You need to take care of your plant really well during this stage.
Once the plant enters the flowering phase, you’ll need to use the right flowering grow lights. You should ideally aim for a 12/12 hours ratio of darkness and light. Don’t rush anything and change the cycles gradually until you reach that point.
You still need to support the plant with proper nutrients during this phase. You can use the same nutrients that I talked about earlier. Eventually, you will see the first buds forming, and that is a sign that the plant is reaching maturity.
After about eight weeks, the plant will be ready for the last step – harvest.
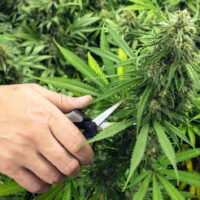
We’re almost done, all you need to do is harvest
Congratulations, the plant is now fully grown and you are ready to harvest it.
Harvesting time may vary from one strain to the next. Proper timing will ensure that your CBD and THC levels are within optimal ranges.
You don’t want to harvest too early nor too late. You will lose precious potency or may end up with a very sedated product if you don’t get it right.
You may also want to dry and cure your plant during the harvest as well. Why? Because you will get plenty of amazing benefits. Some of them include:
- Smaller risk of mold
- Reduced chance of anxiety and paranoia
- Buds will be smoother
- Slightly better taste
Knowing what works best for your strain is the key here, so we encourage you to do additional research on your own.
In conclusion
The steps to cultivating weed may seem overwhelming, but when you get to it, you’ll see it’s not that complicated. Just make sure you follow these instructions, as well as best practices for the particular strain you choose.
Knowing those specifics will help you adapt and fine-tune your strategy so that you can really get a truly exceptional (and healthy) plant.
Related Posts


Helena Miles
Experienced journalist with a decade-long experience of researching cannabis. She has been featured in many prominent outlets, such as The Growth Op, National Post and The Province.
Ken June 17, 2022 at 1:07 am
Awesome article. Thanks. Retiring soon and you know what I’ll be growing.